Saturday, July 31, 2010

Water Pitcher


Water Pitcher, 1897-1913
English
Ironstone
H 11 D 5 inches
Park Authority Purchase, 1978-21-305-01

Manufactured around 1900, this white ironstone pitcher bears the mark of Alfred Meakin, LTD, a large English pottery company that produced for both domestic and foreign markets. Decorated with a wheat and flowers motif, the pitcher’s shape and design are typical of ironstone ware of the period. Used along with a basin in a bathroom or kitchen, the pitcher likely held water to wash one’s face and hands.


Introduced in England, in the early 1800’s, ironstone was intended to be a mass-produced, porcelain substitute. Hard and durable, ironstone is non-porous and safe for food and drink consumption. Known by several names, ironstone is also referred to as "new stone," "opaque porcelain," "English porcelain," "stone china" and "farmer’s china." Spatterware Plate, circa 1840

If you are enjoying reading this blog,Share it on Facebook, Twitter, Buzz or Reddit.

Water Filter

Water Filter, circa 1870
American
Stoneware
H 14.5 D 9 inches
Park Authority Purchase, 1978-21-302

Before the advent of clean water systems and good sanitation, a household water filter filled with charcoal helped purify drinking water. Marked "Oliver Evans, Filterer, No. 15 Chesnut St. Philad.", this stoneware filter also served to advertise Evans’ business.

Stronger and denser than earthenware, stoneware served a variety of domestic uses. Ranging in color from off-white or grey to deep brown, salt-glazed stoneware often has cobalt blue markings or decoration.

If you are enjoying reading this blog,Share it on Facebook, Twitter, Buzz or Reddit.

Cup & Saucer

Royal Art Pottery, England cup and saucer
Royal Art Pottery
Cup & Saucer
Royal Art Pottery, England, cup and saucer. Red rose and blue flowers with green leaf on white background. Moderate wear on the gold rim. No chips or cracks. In good condition

If you are enjoying reading this blog,Share it on Facebook, Twitter, Buzz or Reddit.

Maw and Company: Walter Crane designs in art pottery and tiles


Maw Art Pottery Vase with design by Walter Crane. Shrewsbury Museums Service.

If you are enjoying reading this blog,Share it on Facebook, Twitter, Buzz or Reddit.

Thursday, July 29, 2010

Pottery Demonstration Tall Vase

Charles Smith Pottery Demonstration.


If you are enjoying reading this blog,Share it on Facebook, Twitter, Buzz or Reddit.

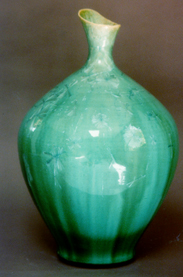
crystal glazed vase


    This is a perfect example of a crystal glazed vase. This vase has been purchased by a private gallery on the California Coast.

If you are enjoying reading this blog,Share it on Facebook, Twitter, Buzz or Reddit.

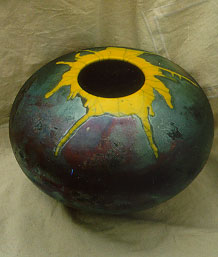
the Raku pottery technique


    The last 25 years or so has seen the Raku pottery technique become increasingly popular among professional and hobby potters alike. The drawing of red hot pots from a kiln, the subsequent smoking of pots (and potters) in sawdust, the tense excitement as the final results emerge when the pots are cooled and cleaned have proved irresistible, especially for potters with pyromaniac tendencies. Many a pottery course has ended with the obligatory raku firing on the last day - a lighthearted event conducted with a stick of wood in one hand and a glass of wine in the other! More recently, however, a growing number of potters have turned to this medium as a 'serious' expression of their work, finding new (or perhaps old) and varied techniques to explore. The famous Japanese potter Hamada said that he wanted to wait until the end of his life before making raku pots as it was the most difficult and important technique to master.

If you are enjoying reading this blog,Share it on Facebook, Twitter, Buzz or Reddit.

Wednesday, July 28, 2010

Tonala Black Clay Pottery


Small Black Clay Vessel


La Familia Mateos
The Mateos family has been making Tonala black clay
pottery for several decades.  They work in a home studio
space that is delightful, and many members of the family
participate in the various steps.

Each vessel is coated before it is fired.
The brush is cloth.
I have put some pictures below to share the process with you.
There are many steps in the production of these exquisit vessels.


The process begins by mixing several clays together to get a clay
maleable enough to allow the shaping as well as the etching of each individual piece.
Eusebio begins to form the clay by hand.
The vessel is made in
two pieces
The pieces are united to
form the vessel
Rigoberto combines parts
that make the shape.
He then removes imperfections and adds or subtracts decorative elements.
The vessels are placed in the sun to dry.
After they have dried sufficiently they are ready
to work.
The vessel is then rubbed with a small river stone, using water, to eliminate the roughness, polishing the surface.
When the vessel has been
polished smooth and shiny, it is covered with an earthtone, like a terra cotta.
It is then covered with an animal fat to preserve the shine on the pot and allow the design to be rapidly cut into the vessel.
The design is then cut into
the vessel.
When the vessels are ready
they go to the kiln.
Several pieces are put into
the kiln at one time.
The vessels are turned frequently.
They are covered with
Eucalyptus leaves to give them the rich black color.
When the fire has burned out the vessels are cleaned.
The result is an exquisit
Tonala black clay vessel.

If you are enjoying reading this blog,Share it on Facebook, Twitter, Buzz or Reddit.

How to Make Pottery Glaze

The Egyptians added ashes to pottery to generate a glossy sheen. Make your own pottery glaze by using common household goods. Modern pottery makers may want to experiment with the variance in kilns and chemicals. Tweak recipes for ceramic glaze to express your creativity.

Instructions

    Dry Glaze

  1. Step 1
    Choose a container that is two times larger than the total amount of finished glaze. Select a 1- to 5-gallon container. If you're making 1/2 gallon of glaze, use a 1-gallon container. This allows enough room to coat the pottery.
  2. Step 2
    Adhere masking tape 1/4 to 1/2 inches from the bottom of the pottery. Placing the tape around the base of the piece helps later on during the firing process.
  3. Step 3
    Pay attention to the cone number. There are a variety of kilns for firing pottery. Each uses the cone number as an indicator for the kiln type. Unless experimenting, use the specific type recommended.
  4. Step 4
    Create a caramel dry glaze (cone 10) by combining 50 grams of pumice stone and 50 grams of rottenstone. For a satin green dry glaze (cone 10) replace the rottenstone with 14 seltzer tablets and 10 grams of talcum powder to the 50 grams of ground pumice. Grind the solid materials into a powder form
  5. Step 5
    Measure dry ingredients one at a time. Pour them into the mixing container. To produce the best results, weigh all chemicals accurately.
  6. Step 6
    Secure the sealable lid on the bucket. Place the container on its side and gently roll it on the floor for 1 to 2 minutes. Allow the dust to settle for at least 1 minute. Remove the lid after the dust has settled.
  7. Step 7
    Apply the glaze to the pottery by dipping the piece into the dry glaze.
  8. Household Substitutes

  9. Step 1
    Use cat litter for the clay component in pottery glaze. Purchase a bag of clumping litter for the best results.
  10. Step 2
    Substitute the calcium carbonate with generic antacids. Name brand antacids contain additional chemicals such as magnesium carbonate. Visit the hardware store and purchase the powder used to make the white lines on a football field, also known as calcium carbonate.
  11. Step 3
    Locate pumice or rottenstone that contains feldspar, another significant ingredient in pottery glaze. Find ground pumice stone or get an inexpensive stone for foot care and grind it yourself. You can buy rottenstone in paint and hardware stores.
  12. Step 4
    Pour milk of magnesia into the glaze. It contains magnesium carbonate. Baby powder in talc form also offers this chemical.
  13. Step 5
    Replace the required amount of silica with cleanser, toothpaste or gel packs from electronic merchandise.
  14. Step 6
    Peruse the aisles of the local drug store for medicated powder or antiseptic ointment. The zinc oxide necessary to make glaze is found in these products. Find a sunscreen that contains titanium dioxide to use in making pottery glaze. This ingredient is also found in liquid paper.
  15. Liquid Glaze

  16. Step 1
    Measure out 3200 grams of feldspar, 2400 grams of whiting, 2400 grams of silica, 800 grams of zinc oxide, 1200 grams of kaolin, 400 grams of copper carbonate and 15 grams of white cement.
  17. Step 2
    Pour the ingredients one at a time into the first 5-gallon bucket.
  18. Step 3
    Add water into the second 5-gallon bucket until the container is 25 percent full. Agitate the water with the drill and paddle attachment. Slowly pour in the dry chemicals. Add water in increments of 10 percent to thin the glaze.
  19. Step 4
    Mix all of the ingredients until the desired consistency is met. Apply the liquid glaze to the pottery with a brush, spray or by using the dip method.

If you are enjoying reading this blog,Share it on Facebook, Twitter, Buzz or Reddit.

Pottery throwing demonstration


In this series of photos, Bill demonstrates the art of "throwing" a pot. The process begins with a lump of clay which is carefully formed into a beautiful vessel using an electric potters wheel and a few simple tools. It's amazing to watch as Bills considerable talent and experience make the process look almost effortless.


If you are enjoying reading this blog,Share it on Facebook, Twitter, Buzz or Reddit.
Twitter Delicious Facebook Digg Stumbleupon Favorites More